
BobDyn/BobSim Startup
By the end of this page you will have the BobSim app open, a vehicle saved, that vehicle written into the Modelica stack, one simulation run, and a PDF report to look at.
You need only Git, Make, and Docker. The app and every simulation run inside the BobSim Docker image, which contains OpenModelica. You do not install OpenModelica or Python.
How BobSim Works
BobSim never simulates anything itself. It turns your vehicle numbers into Modelica code, hands that to OpenModelica to compile, runs the compiled program, and collects what comes back.
Text version
- Setup view: you edit vehicle numbers.
- Write to MBD: the numbers become Modelica records.
- Build: OpenModelica compiles a simulator.
- Simulation view: the simulator runs your cases.
- Archive view: PDF report, metrics CSV, signals.
That chain is why the app locks each step until the one before it is done. The left rail has four views:
| View | What it is for |
|---|---|
Setup | Define the vehicle: architecture, geometry, mass, suspension, tires, aero, powertrain |
Simulation | Configure and launch a study against the current vehicle |
Replay | Play back a captured run in 3D: suspension geometry, tire loads, and grip |
Archive | Download reports, metrics, and signal data from finished runs |
Replay is not part of the chain. It draws scenes that you capture separately. See Replay A Captured Run.
Install What BobSim Needs
| Tool | Why |
|---|---|
| Git | Clone BobSim and its BobLib submodule |
| GNU Make | Every workflow is a make target |
| Docker with Docker Compose | The app and the make targets run inside the BobSim image |
The image is built from openmodelica/openmodelica:v1.26.3-ompython. It installs the exact Modelica libraries BobLib needs (Modelica 4.1.0 and VehicleInterfaces 2.0.2) and the Python packages in requirements.txt. It builds on x86_64 and on ARM64 hosts, including Apple Silicon.
Step 1: Clone BobSim
Clone with submodules. BobSim vendors BobDyn/BobLib at _0_Utils/external/BobLib/.
git clone --recurse-submodules https://github.com/BobDyn/BobSim.git
cd BobSim
make init
make init runs git submodule update --init --recursive. Do not skip it. Without BobLib every Modelica build fails.
Where commands run
Everything in this guide runs from the BobSim repository root, the directory the clone step created.
Step 2: Build The Docker Image
make docker-buildThis builds the bobdyn/bobsim:latest image. The first build downloads the OpenModelica base image and can take some time. Later builds reuse it.
List every target with a description:
make helpStep 3: Launch The App
make appThe terminal prints:
BobSim app in Docker. Open http://127.0.0.1:8765
...
BobSim app running at http://0.0.0.0:8765
Open http://127.0.0.1:8765. The second line is the address inside the container. Docker publishes it on 127.0.0.1 only, so the app is not visible to other machines on your network.
Stop the app with Ctrl+C in the same terminal. That also removes the container.
To use a different port:
make app APP_PORT=8766The repository directory is mounted into the container. Everything the app saves lands in your checkout, the same as for the make targets.
Step 4: Confirm OpenModelica
Click OpenModelica in the top bar to open the Toolchain dialog. In Docker it shows omc as /usr/bin/omc and Libraries as /root/.openmodelica/libraries. The app finds both on its own. You do not need to change or save anything.
Step 5: Choose A Vehicle
The first screen is the vehicle dialog.
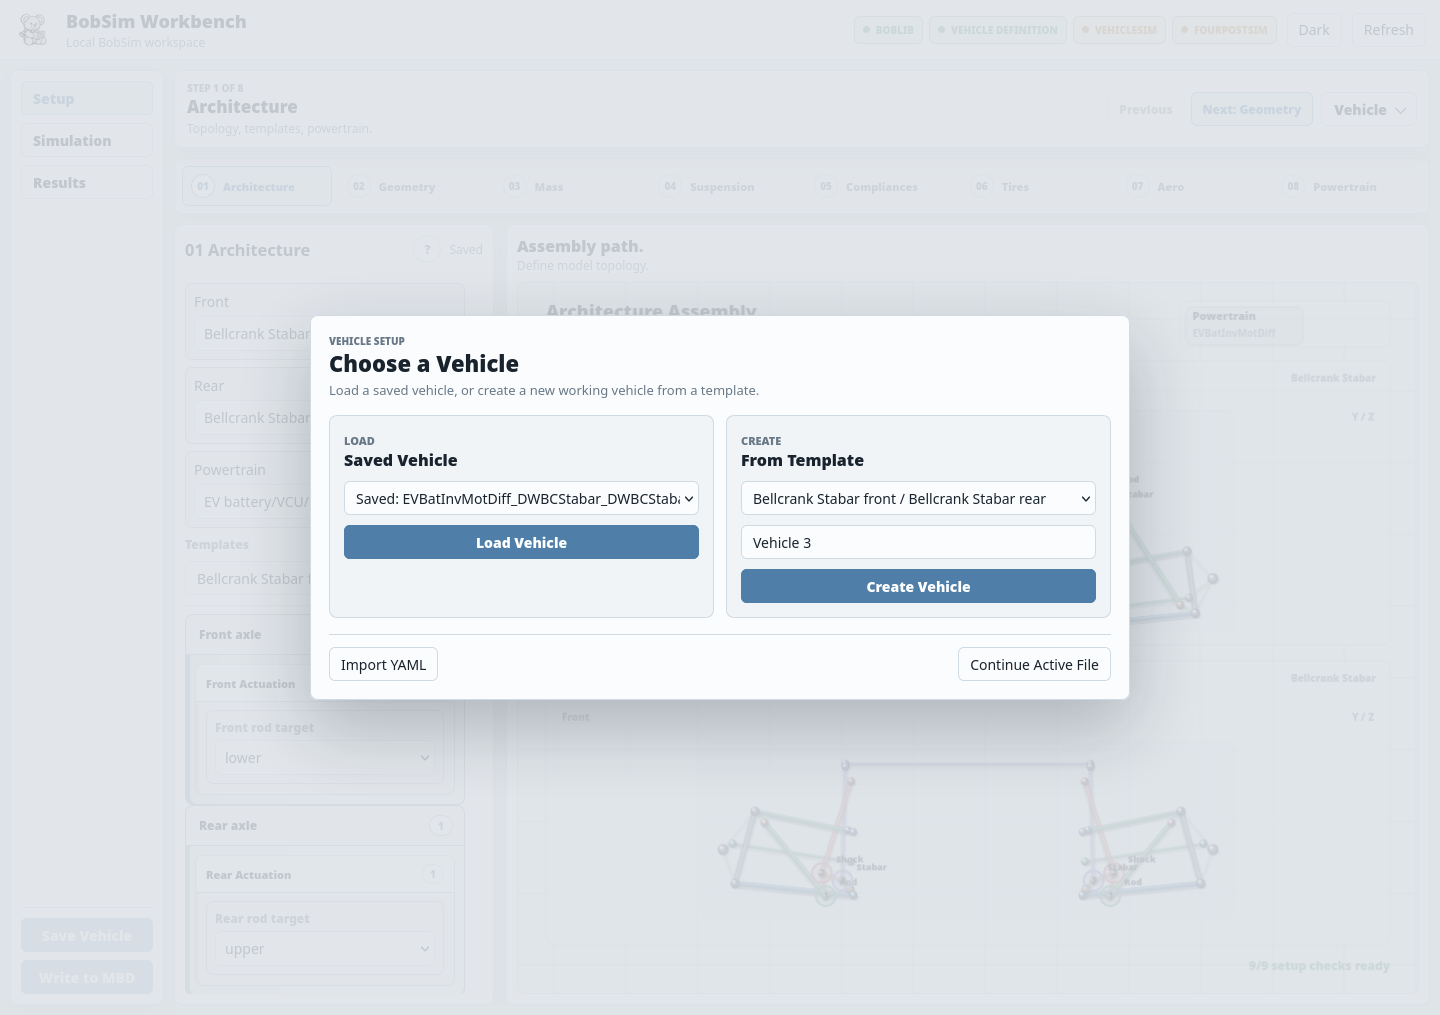
| Path | Use it when |
|---|---|
Load Vehicle | You already saved a vehicle in this app |
Create Vehicle | You want a fresh vehicle from a checked-in architecture template |
Import YAML | You have a vehicle YAML file from somewhere else |
Continue Active File | You want to keep working from the repo's active vehicle.yml |
For a first run, pick Create Vehicle: choose a template, type a name, and click the button. Templates are named <front>_<rear> by suspension architecture, for example DWBC_DWBCRecord.
Step 6: Work Through Setup
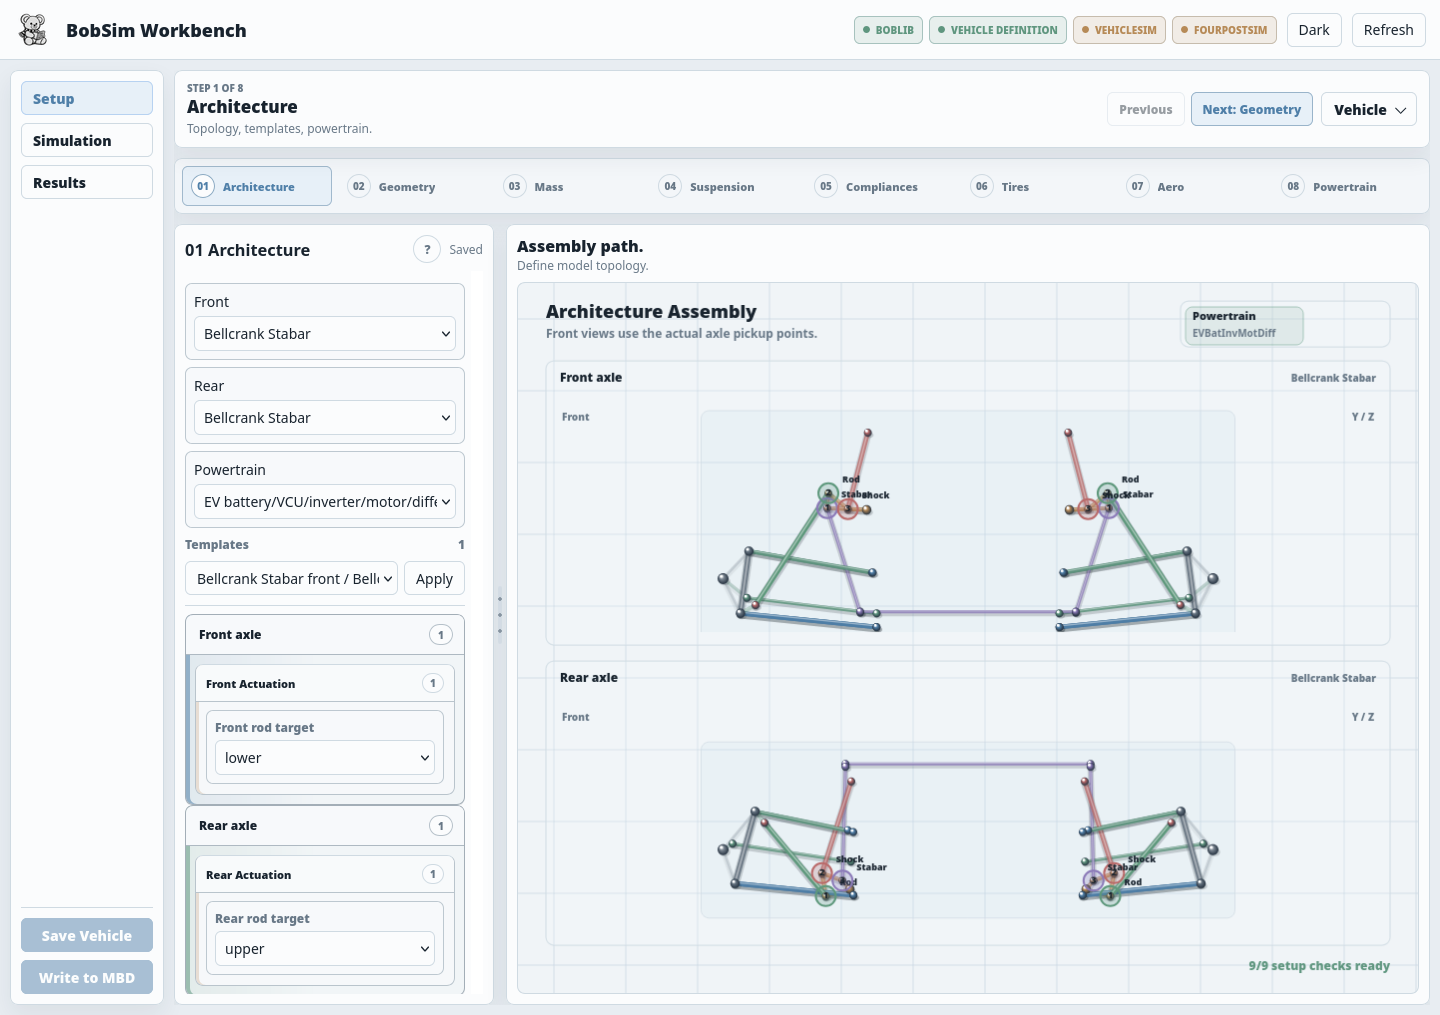
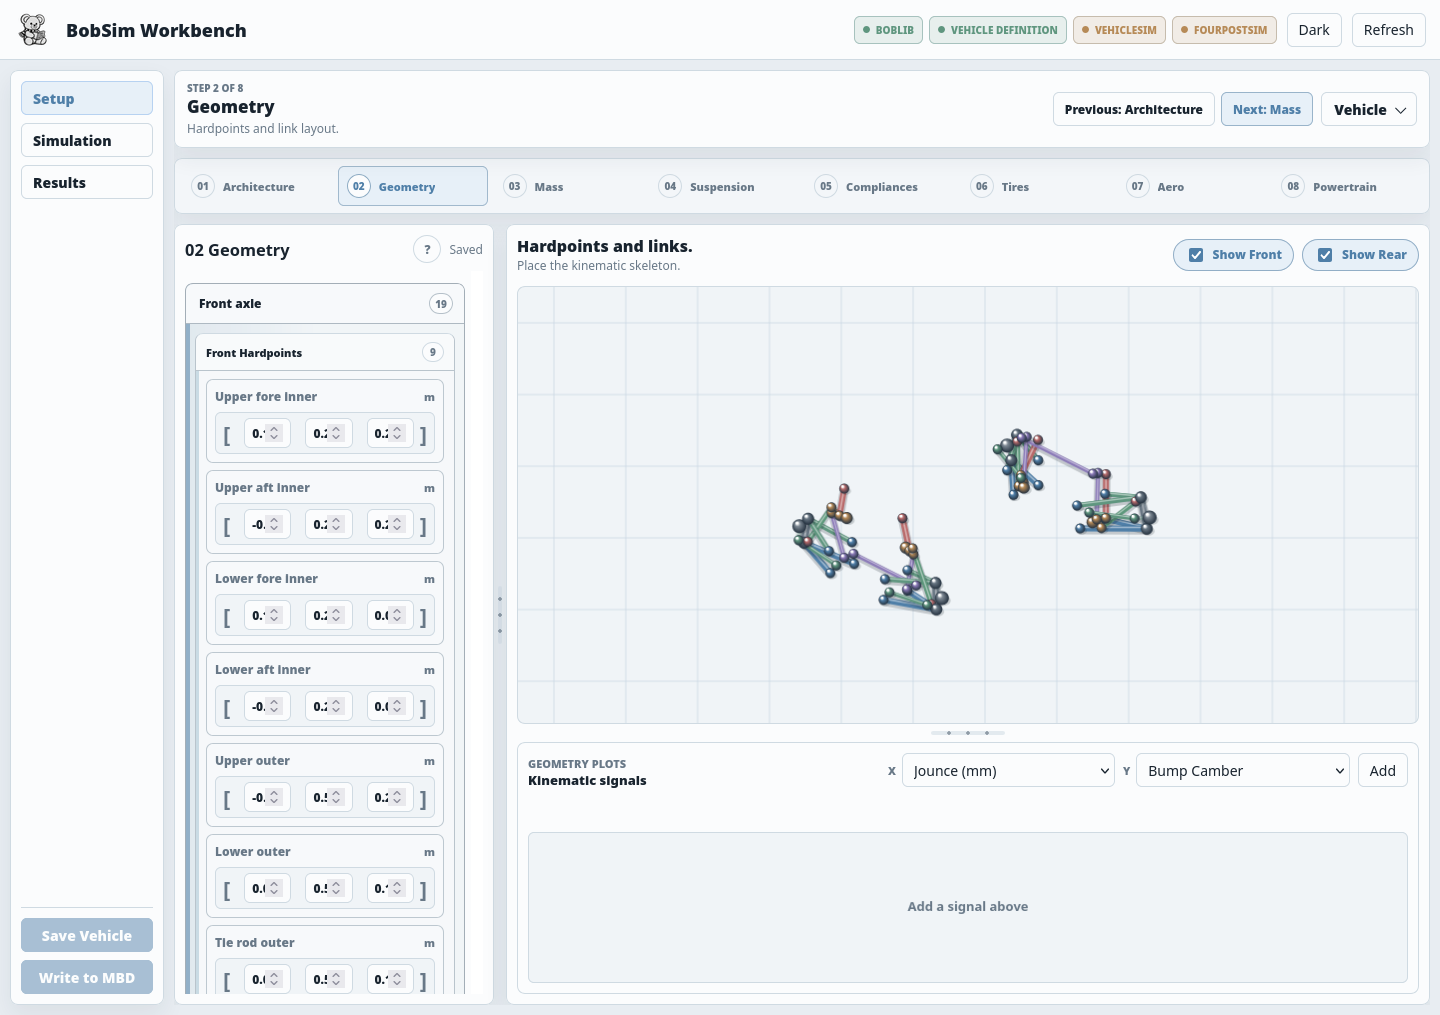
Setup has eight steps. The tabs across the top are numbered, and Next and Previous walk them in order:
- Architecture
- Geometry
- Mass
- Suspension
- Compliances
- Tires
- Aero
- Powertrain
The left pane is the editor, the right pane is a live preview of whatever the current step affects. The ? button beside the editor title opens the app's own notes for that step: what it is for, what the preview shows, and what to sanity-check before moving on.
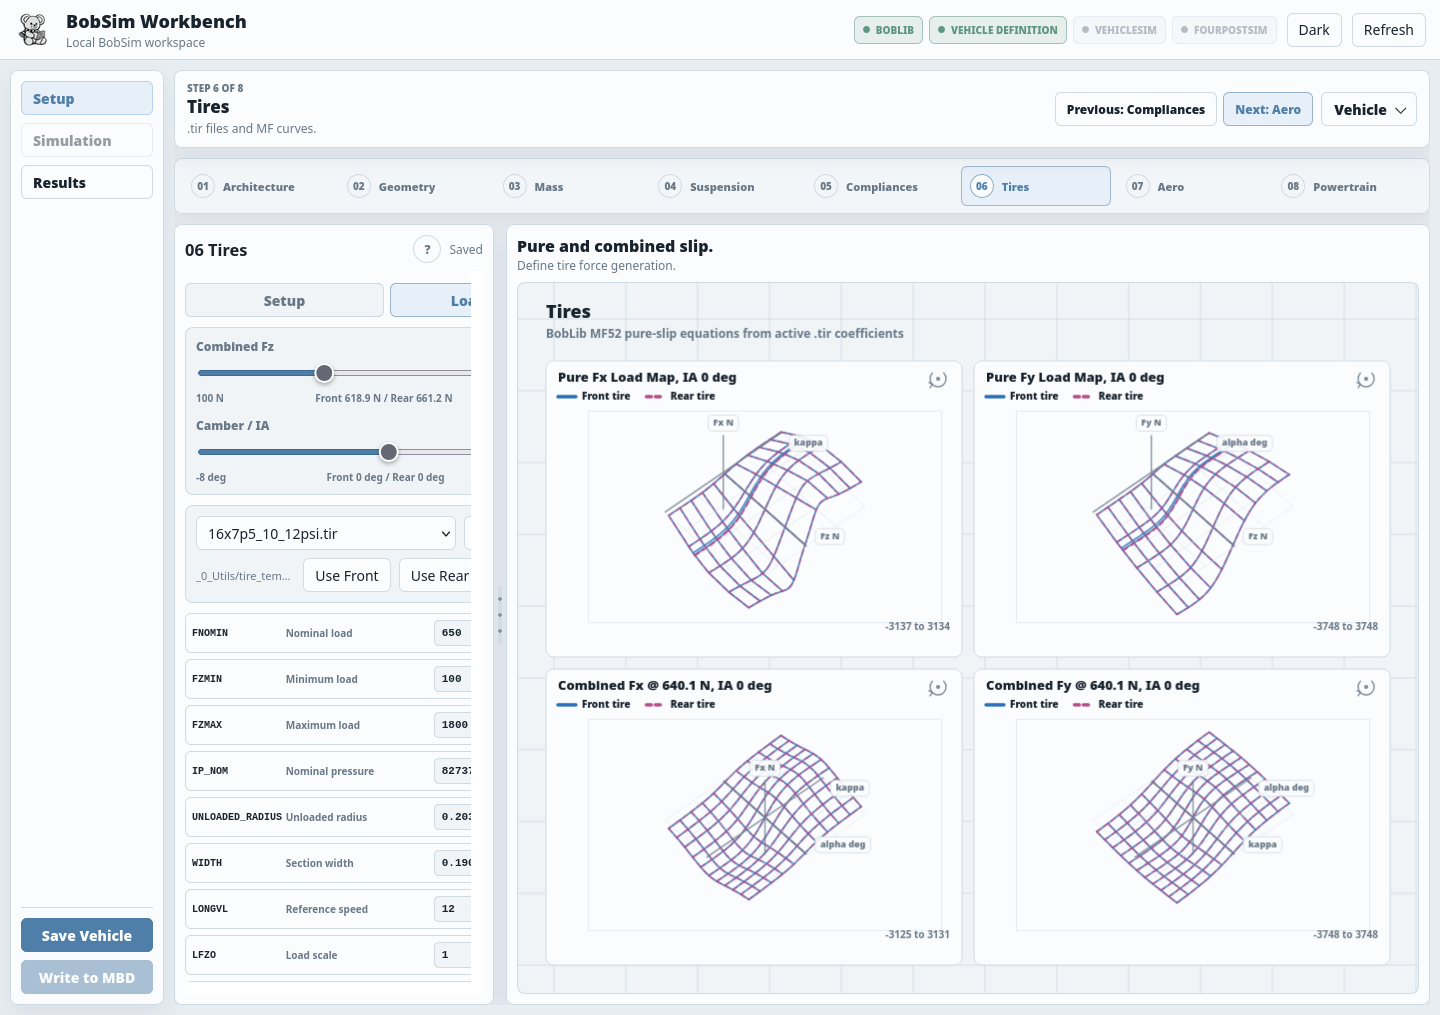
The Tires step also takes .tir files and redraws its pure and combined slip load maps from the active tire as you edit.
You do not have to finish all eight steps before simulating. A template is already internally consistent, so you can run it as-is the first time.
Step 7: Save And Write To MBD
Two buttons at the bottom of the left rail, in this order:
- Click
Save Vehicle. - Click
Write to MBD.
Write to MBD writes the vehicle as Modelica records into the BobLib submodule, under BobLib/Records/VehicleDefn/. The status strip in the top bar tracks the chain from How BobSim Works:
| Status | Meaning |
|---|---|
BobLib | The BobLib submodule is present |
Vehicle Definition | The saved vehicle has been written to the Modelica stack |
VehicleSim | The RampSteer/SteadyState/Transient build is ready, missing, or stale |
FourPostSim | The four-post build is ready, missing, or stale |
If Write to MBD is greyed out, hover it. The button states its own reason, and the fix is usually one of:
- Initialize the BobLib submodule first — run
make init - Save this vehicle config before writing to MBD — click
Save Vehicle - Vehicle definition is already current in MBD — nothing to do, move on
Step 8: Run Your First Simulation
Open Simulation.
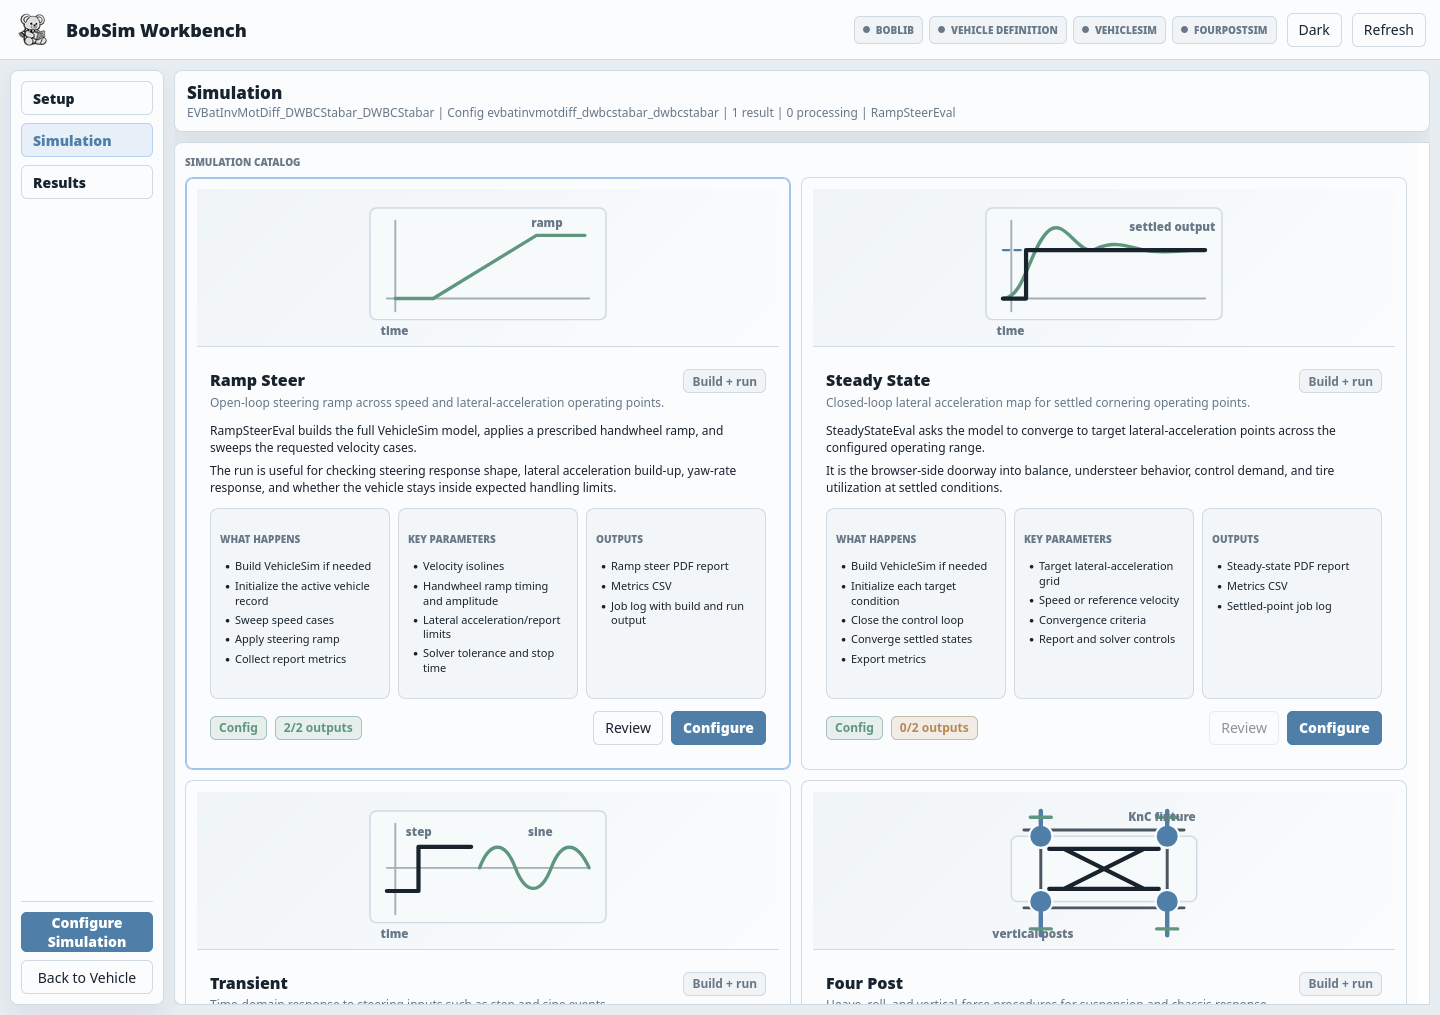
| Card | Use it for |
|---|---|
Ramp Steer | Open-loop steering ramp response |
Steady State | Settled lateral-acceleration operating points |
Transient | Step and sine steering response |
Four Post | Heave, roll, and vertical-force suspension procedures |
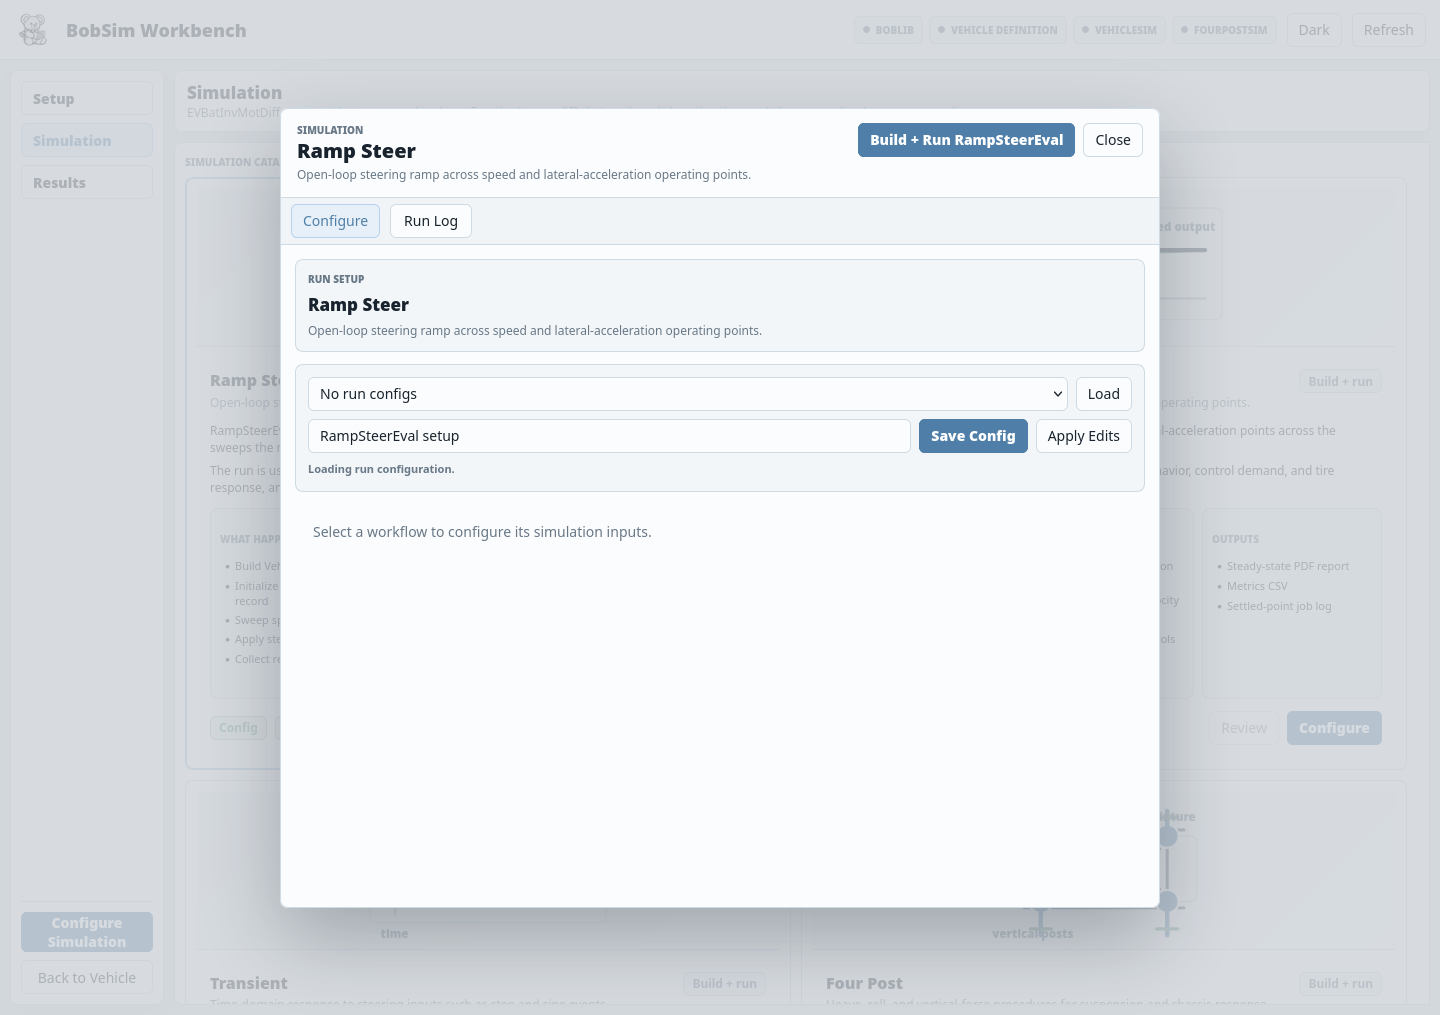
Each card explains what the run does, which parameters matter, and what it produces. For a first proof run, take Ramp Steer:
- Click
Configure. - Read the run fields. Change nothing yet.
- Click
Build + Run RampSteerEval. - Switch to the
Run Logtab and watch. - Click
Reviewwhen it finishes.
The first build is slow: OpenModelica is compiling the whole vehicle model. Later runs reuse it unless the vehicle definition changed, which is what the VehicleSim and FourPostSim status lights are telling you.
If you edit a config field, the run button becomes Apply + Build + Run. Either click Apply Edits first, or let the run button apply them for you.
Step 9: Review The Results
Open Archive, or click Review on the workflow card.
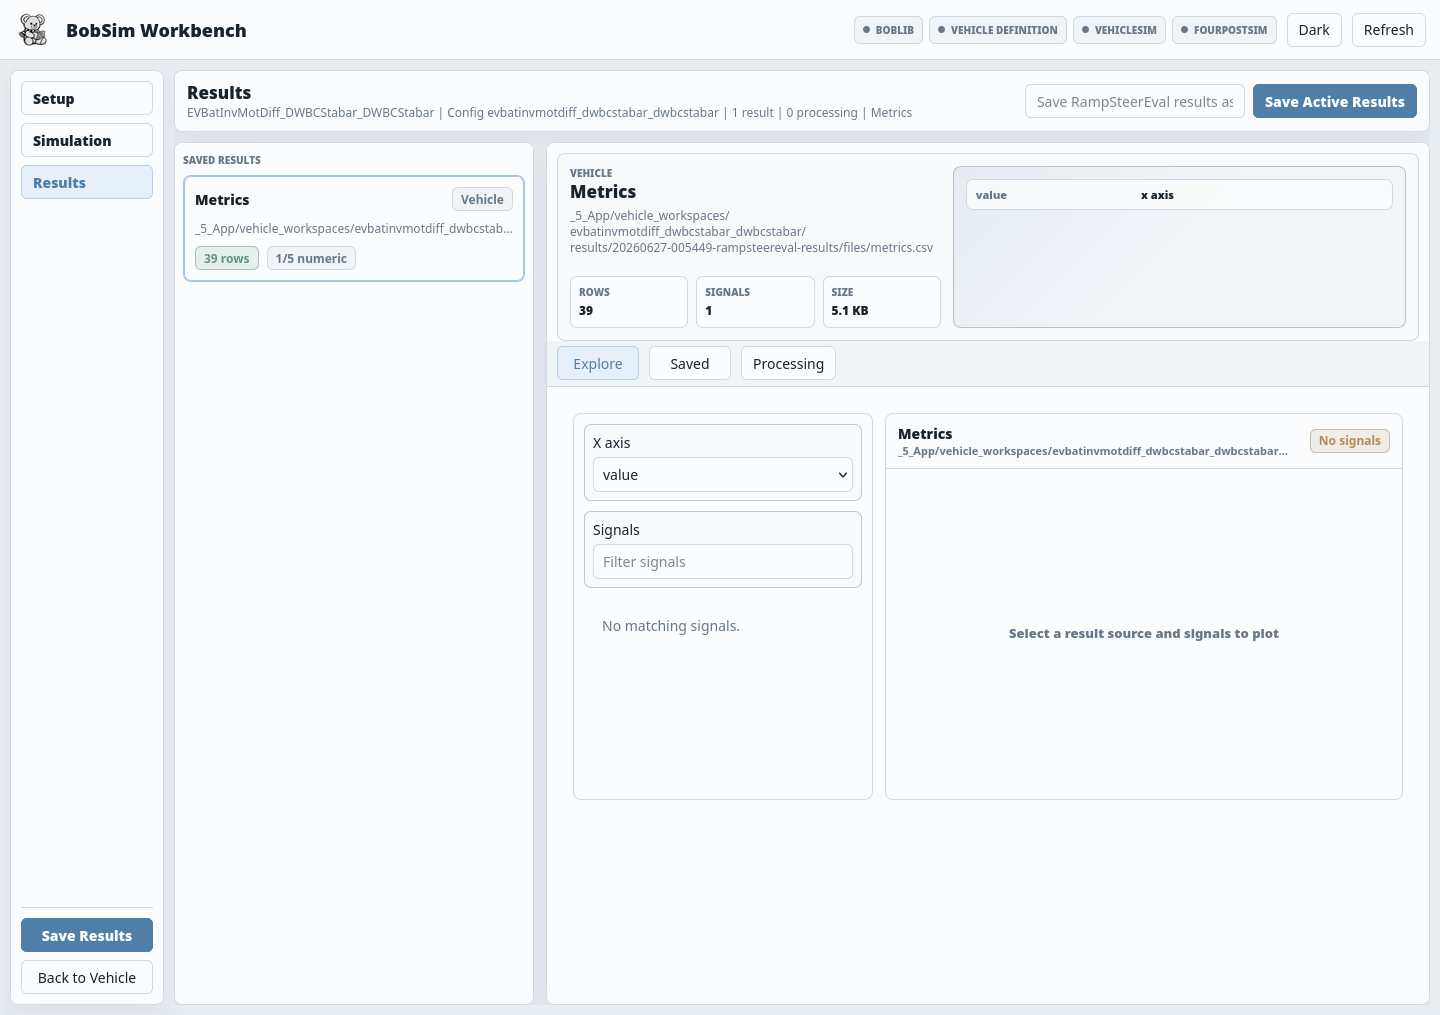
Every successful run becomes an archive package you can download:
- the generated PDF report, previewable in the browser
- the metrics CSV
signals.zip, holding amanifest.jsonand one folder per run withsignals.csv,overrides.txt,run.log, anddescription.jsonrun-description.json, which describes the runvehicle.ymlandconfig.yml, snapshots of the vehicle and study config that produced the run
FourPostEval leaves raw time-series appendix pages out of its PDF by default (raw_time_series_appendix: false) so the K&C report stays readable.
Delete removes a package from both the global archive and the vehicle workspace.
Where BobSim Puts Your Files
| Path | Contents |
|---|---|
_3_StandardSim/generated_results/ | Reports and metric CSVs from the standard studies |
_3_StandardSim/BuildBobLib/VehicleSim/ | Compiled VehicleSim and its run directories |
_3_StandardSim/BuildBobLib/FourPostSim/ | Compiled FourPostSim and its run directories |
_5_App/user_data/config/vehicles/ | Saved vehicles, one YAML per vehicle |
_5_App/user_data/config/simulations/ | Saved simulation configs |
_5_App/user_data/config/active/ | The app's editable copies of the study configs |
_5_App/user_data/config/defaults/ | Original copies of the EnvelopeSim and OptSim configs |
_5_App/user_data/config/app/ | App settings. The app in Docker keeps its OpenModelica choice in openmodelica.docker.json, the app on the host in openmodelica.json. |
_5_App/user_data/results/saved/ | Archive packages |
_5_App/user_data/workspaces/vehicles/<vehicle>/ | Per-vehicle builds, results, and processing |
_5_App/user_data/cache/modelica/ | Modelica build cache |
On Linux, files written from the container belong to root. make clean-owned deletes the generated results and app data through the container, so you do not need sudo.
The CLI Path
The make targets run the same studies without the app, for scripts and CI. They also run inside Docker and share the builds in _3_StandardSim/BuildBobLib/ with the app.
make standard-eval-ramp-steer
make standard-eval-steady-state
make standard-eval-transient
make standard-eval-four-post
make standard-eval-all
Each target builds what it needs first (make standard-build or make standard-build-four-post). The build targets depend on the records in BobLib/Records/VehicleDefn/, so after Write to MBD changes them, make rebuilds before it runs. Reports go to _3_StandardSim/generated_results/, for example ramp_steer_eval_report.pdf.
The CLI reads the app's config copies
When you edit a study config in the app, BobSim writes the change to _5_App/user_data/config/active/. After that, the make standard-eval-* targets read that copy, not the checked-in file under _3_StandardSim/. Set BOBSIM_SEED_CONFIGS=1 to force the checked-in file.
Envelope and sensitivity workflows:
make envelope-all
make opt-standard
make opt-envelope
make opt-refined
Check that the BobLib records match the active vehicle.yml without the app:
make sync-vehicle
make sync-vehicle-write
make sync-vehicle reports stale records and exits with an error if it finds any. make sync-vehicle-write regenerates them.
Open a shell inside the container with make shell. Run lint, typecheck, and tests with make ci.
Replay A Captured Run
The Replay view plays back a run in 3D. A normal simulation run does not feed it, because a normal run keeps only the signals its metrics need. Until you capture a scene, Replay shows "No captured runs yet".
To see Replay work, write the synthetic demo scene. It needs no simulation. Then start the app and open Replay. Both run in Docker:
make visual-demo
make app
To capture a real run, BobSim runs one study again and records the suspension geometry. Every step runs in Docker:
make visual-rig
make visual-maneuver VISUAL_MANEUVER=transient
visual-rig captures the four-post rig. visual-maneuver takes transient, ramp_steer, or steady_state. Scenes are written to _1_VisualSim/results/. In the view, Controls shows the camera keys and Export video saves a recording.
Run The App Without Docker
RUN= empties the Docker prefix, so a target runs directly on your machine:
make app RUN=On the host, the app needs a Python 3.11 environment with the BobSim dependencies:
python -m venv .venv
source .venv/bin/activate
python -m pip install --upgrade pip
python -m pip install -r requirements.txt
On Windows PowerShell, activate with .venv\Scripts\Activate.ps1 instead.
To simulate from the app on the host, you also need a local OpenModelica with the exact library versions:
installPackage(Modelica, "4.1.0", exactMatch=true);
installPackage(VehicleInterfaces, "2.0.2", exactMatch=true);
Without it, the Simulation view stays locked, and everything else in the app works.
The app looks for OpenModelica on its own every time it checks status. It searches the usual install locations and these environment variables:
| Variable | Sets |
|---|---|
BOBSIM_OMC, or OMC | The omc executable |
BOBSIM_OPENMODELICA_HOME, or OPENMODELICAHOME | The OpenModelica install directory |
BOBSIM_OPENMODELICA_LIBRARY | The library directory |
If detection finds nothing, set the two fields in the Toolchain dialog by hand. The dialog lists the candidate paths it found:
- omc executable:
omc.exeon Windows,omcelsewhere - Library directory: where
installPackageput Modelica and VehicleInterfaces
| Platform | Typical library directory |
|---|---|
| Windows | %APPDATA%\.openmodelica\libraries |
| macOS | ~/.openmodelica/libraries |
| Linux | ~/.openmodelica/libraries |
Click Save. BobSim checks that the executable runs and that both required libraries are present, and names the missing one if not. Auto clears your manual paths and goes back to automatic detection.
The toolchain check only looks for the library folders. It does not compare versions, so a wrong version passes the check and then fails at build time.
RUN= works the same way for the simulation targets, for example make standard-eval-all RUN=. They then need a local omc with the exact library versions. GitHub Actions uses RUN= for its fast gate (make lint RUN=, make typecheck RUN=, make test RUN=).
The Released Desktop App
The GitHub Release has a desktop build of the app. It bundles its own Python, but it does not use Docker. To simulate, it needs a local OpenModelica, set up as in Run The App Without Docker.
Download the asset for your operating system, extract it, and run BobSim.exe on Windows, BobSim.app on macOS, or BobSim on Linux. Assets are named BobSim-<version>-<os>-<arch>, for example BobSim-<version>-windows-x86_64.zip. They ship as .zip on Windows and macOS and as .tar.gz on Linux. Each asset has a .sha256 checksum file next to it. The macOS asset is built for Apple Silicon (arm64).
The desktop app starts the same local server as make app, picks a free port, and opens it in an embedded window. If that window is unavailable it falls back to your default browser. On Linux the embedded window needs GTK (gi) or PyQt6-WebEngine.
It keeps its files in a per-user runtime root instead of the repository:
| Platform | Runtime root |
|---|---|
| Windows | %LOCALAPPDATA%\BobDyn\BobSim |
| macOS | ~/Library/Application Support/BobDyn/BobSim |
| Linux | ${XDG_DATA_HOME:-~/.local/share}/BobDyn/BobSim |
Set BOBSIM_HOME to put it somewhere else.
Common Problems
BobLib submodule missing
make initmake app or another target fails with a Docker error
Check that Docker is running and that docker compose version works. Then build the image again:
make docker-buildThe app page does not load
Open http://127.0.0.1:8765, not the 0.0.0.0 address the container prints. If another program already uses port 8765, start the app with make app APP_PORT=8766 and open that port.
Simulation is locked
Hover the locked control. It names the reason. In order, the app wants the vehicle saved, then written to MBD, then a verified OpenModelica toolchain. In Docker the toolchain is always present. On the host, see Run The App Without Docker.
No module named yaml
You are running the app on the host with RUN=, without the dependencies. Install them into the same interpreter:
python -m pip install -r requirements.txtToolchain saved but a library is reported missing
This happens on the host only. The library directory does not contain that library at all. Check that Library directory points at the folder installPackage wrote to, and install the exact versions.
A run failed and you want the raw directory
It is already there. All four shipped configs set execution.cleanup: false, so run directories are kept under the build directory:
_3_StandardSim/BuildBobLib/VehicleSim/results/run_<id>/
_3_StandardSim/BuildBobLib/FourPostSim/results/run_<id>/
If results/ is not writable, BobSim writes to runs/ in the same build directory instead.
Each holds run.log, overrides.txt, the raw result CSV, and a manifest. If the directory is gone, something set execution.cleanup: true. Check the app's copy in _5_App/user_data/config/active/ first, then the checked-in config. Set it back to false and rerun.
You want to start the app from a clean state
This deletes saved vehicles, configs, toolchain settings, workspaces, the build cache, and archive packages in _5_App/user_data/:
make clean-appNext Pages
- BobSim App for a full tour of the app views
- BobSim Use Guide for the normal workflow after setup
- BobDyn/BobSim overview for the repo map and CLI target language
- StandardSim for the high-fidelity evaluation details
- Configuration for YAML and build details